• Recipes
  • Blog
  • About
  • Services
  • Search
Menu

Dixie Caviar

Street Address
City, State, Zip
Phone Number
A New Kind of Southern

Your Custom Text Here

Dixie Caviar

  • Recipes
  • Blog
  • About
  • Services
  • Search

Recipe: Dixie Caviar

August 2, 2012 Nealey Dozier Thompson
Dixie Caviar Recipe_new I-2

One of my first posts here at Dixie Caviar was obviously the recipe for its namesake. The blog (and the recipe) has come a long way since those humble beginnings, so it seemed time to give the original post a fresh new look. Here it is again, folks, Dixie Caviar in all its Southern glory. Four years later and it continues to please...

Dixie Caviar Recipe-2

(The excerpt below is taken from the '09 recipe archives.)

"So what the heck is Dixie Caviar?"

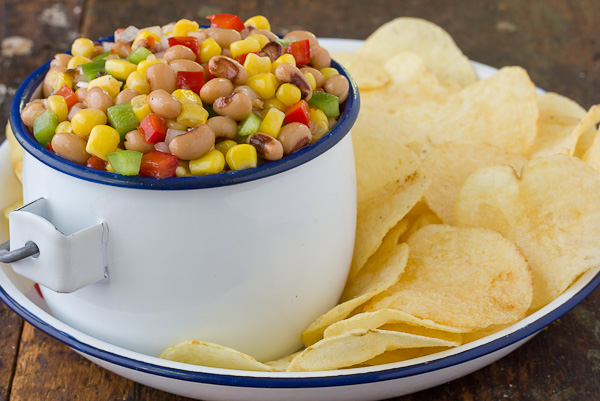
Yes, I get that one a lot. And no, Dixie Caviar is not some fluffy-sounding name that conceals an otherwise nasty animal product—trust me, it is no rocky mountain oysters. Dixie Caviar is actually a crazy-easy, crazy-addictive appetizer made famous here in the South. (Southerners have an amazing ability to "fancify" anything we get our hands on, canned black-eyed peas included.) You may have heard it called Texas, or Cowboy, Caviar; either way, it's delicious no matter the name.

Dixie Caviar was introduced to me by my boyfriend fiance's sweet mother Tina the very first time we met. I was hooked after just one bite; it may be simple but damn it sure does pack a flavor punch. (It's no wonder that it's her signature appetizer.) Tina sent me back to Los Angeles with the recipe in tow, and it has definitely earned its fair share of sky miles. No future barbecue or birthday party shall ever be without it again!

Little did I know that it would one day inspire the very title of this blog. Talk about an Aha! moment—Dixie Caviar was the first name to come to mind, and it was the last. (Why keep looking when you've already found perfection?) Of course I love the appetizer, but more importantly the name perfectly represents my style in the kitchen:  little bit country, a little bit 'Cal. It's a double whammy, for sure.

Dixie Caviar Recipe_new I-3
DIXIE CAVIAR
Yields: 3 cups

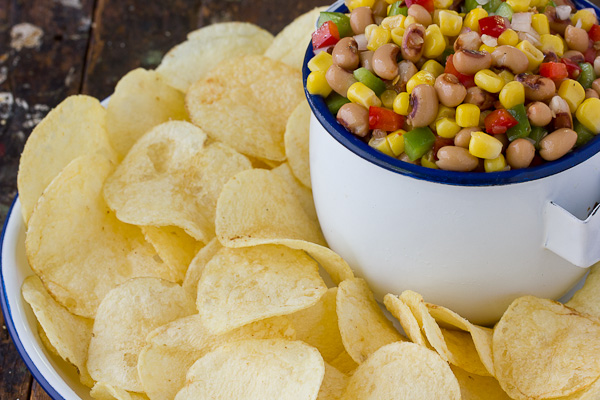
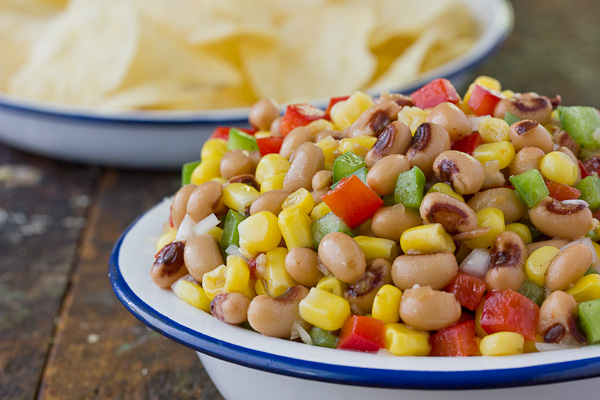
Dixie Caviar is the perfect dip for outdoor parties and tailgates because it keeps forever and you don't have to worry about it going bad. The best part? There's never any left! Use this recipe as a "kitchen sink"—I don't think I've ever made the same batch twice. I've used black beans, canned pimentos, scallions, shallots, and more. Throw in whatever you have on hand!I've tried to gussy it up before with homemade Italian dressing, but it's just not as good. Suck it up and buy a bottle.

1 can black-eyed peas, drained and rinsed
1 cup fresh or frozen yellow corn (thawed if frozen)
1 small red onion or 2 large shallots
1 small red bell pepper, diced small
1 small green bell pepper, diced small
3/4 cup Italian salad dressing (I use Kraft Zesty Italian)
Kosher salt and pepper, to taste

Mix all the ingredients in a large bowl. Chill for an hour before serving to let the flavors combine. Serve with Lay's Classic potato chips or tortilla chips.
Dixie Caviar Recipe_new I-4
In Recipe Tags appetizer, black-eyed peas, cowboy caviar, dip, dixie caviar, Recipe, Southern, texas caviar
11 Comments

Recipe: Orzo with Summer Vegetables

July 27, 2012 Nealey Dozier Thompson
Orzo Salad with Summer Vegetables

Back in college, I spent one glorious month studying abroad in Florence with my greatest accomplice, Jen. I went with the best of intentions: to master the beautiful Italian language. Turns out, the only thing I mastered was the food. (I promise I'm not complaining!) I spent far more time roaming the farmers markets and sampling gelato than I did in museums or class. And while the other girls in my program were off spending their fathers' hard earned money on Gucci and Prada, I was eating like a queen.

In between epic meals of pera tortelloni and bistecca alla Fiorentina, there were affogatos, pizzette, and plenty of bacio (the ice cream, not the kiss) to spare. But then I started to yearn for something else. After a few too many heavily sauced meals—and a few too many extra pounds—I started to crave something light! One evening, a few of us ladies decided to forgo our usual dinner plans and cook in. We procured wine and cheese and various other local ingredients. And then we feasted. To be honest, the only contribution I remember was a nondescript side: orzo pasta tossed with roasted zucchini and eggplant, a splash of olive oil, and a squeeze of lemon. It was perfection on a plate.

Looking back on my trip, it's funny how that simple pasta salad is one of the first taste memories that comes to mind. Of all the restaurants and all the meals, it's the most basic dish that stuck. Now I recreate that orzo from home all the time, whether it be for lunches, dinners, parties, or potlucks. This recipe is a reflection of that wonderful home cooked dinner in Italy. My version has evolved a bit over the years—just like my taste—and I know it's for the better. I hope you enjoy my little reminder of Florence, too.

ORZO WITH SUMMER VEGETABLES
Source: Inspired by Italy, recipe adapted from Ina Garten
Yields: Serves 2 for lunch (as entree) or 4 (as side) for dinner

This "recipe" is really just a guideline. Use whatever vegetables you have on hand and adjust the olive oil and vinegar to your liking. (We all know I'm a vinegar fiend, so always more for me!) Don't forget that feta is salty, so add it before you taste for final seasonings.

For the vegetables:
3-4 small yellow squash, diced into 1/2" pieces
1 -2 zucchini, diced into 1/2" pieces
1 small red bell pepper, seeded and diced into 1/2" pieces
1 small red onion, diced into 1/2" pieces
3 cloves garlic, minced
1 tablespoon olive oil
Kosher salt and pepper, to taste

For the pasta:
3/4 cup orzo pasta
1/4 cup red wine vinegar
3 tablespoons good quality olive oil
Kosher salt and pepper, to taste
Feta cheese, for serving

For the vegetables: Preheat oven to 400 degrees F. Toss vegetables including garlic with 1 tablespoon olive oil, and salt & pepper to taste. Roast, stirring once or twice, until vegetables are soft and just beginning to caramelize, about 20 - 30 minutes. Meanwhile, cook the orzo in boiling, salted water, approximately 7-9 minutes. Drain and transfer to a large bowl. Scrape the roasted vegetables with their pan juices into the pasta. Add vinegar, olive oil, salt, and pepper to taste. Cover and bring to room temperature before serving, at least one hour. Toss with a generous amount of crumbled feta. Taste and adjust ingredients for personal preference.


Orzo Salad with Summer Vegetables
In Recipe Tags feta, Ina Garten, orzo, orzo with summer vegetables, pasta, pasta salad, roasted vegetables
2 Comments

Recipe: "The Best Ever" Southern Biscuits

July 18, 2012 Nealey Dozier Thompson

It's a bold statement on my part to call a recipe the best. While I always attempt to uncover the "ultimate" version of a dish, it is virtually impossible to conclude whether something is or isn't, in fact, the greatest in the world. Personal taste, in addition to the countless other external factors that effect a recipe, can all swing the pendulum of perfection either way.

But when it comes to Southern biscuits, I'd like to think I have a pretty decent grasp of the qualities a good one should possess. I worked at a Cracker Barrel for goodness sake, home to the airiest, most angelic of them all. (And no, the following is not their recipe. This is soooo much better.) And just in case you were wondering, here are my personal requirements for an unparalleled biscuit:

1. A superior biscuit, to me, is featherlight and fluffy as a cloud. It should spring to the touch, crumble when cupped, and melt away the minute it hits your lips.

2. I want—wait, scratch that—I demand big flavor. A biscuit needs plenty of salt, and a biscuit isn't good if it must be slathered in condiments to be edible. Hot-from-the-oven, it should be a divine sensory experience all on its own.

3. Last but not least, a biscuit needs butter. Lots and lots of butter—I'm talkin' inside, on top, and everywhere in between. Trust me here, this is definitely not the time to be holding back on the calories.

Are y'all with me?! You see, biscuits are practically in my blood. One of my fondest food memories involves my six-year-old self, devouring a Tyler's all-butter biscuit in the backseat of my parents' yuppy station wagon. We were headed to church, and I vividly remember the look on my mother's face when she saw streams of butter dribbling down my chin, grease splattered across my pressed cotton jumper and formerly-white tights. Boy was she mad. (And lets just say it wasn't the first time, and definitely not the last!)

I've spent many years since trying to recreate the perfect Southern biscuit—the one that requires a fistful of napkins; I've even blogged about the search here (and here and here). I've found pretty good recipes, and less-than-decent ones, but none that ever pulled me from the power of Pillsbury. At least until I discovered Shirley Corriher, the apple of my biscuit-lovin' eye. More importantly, I discovered her "Touch of Grace" Biscuits. Deemed a "genius recipe" by the smart gals at Food52, it was unlike any biscuit recipe I had ever seen. Which is why after reading it, I headed straight to the kitchen to see what all the fuss was about.

Let's just say my prayers were answered—no other biscuit recipe will pass through these oven doors again. Seriously, they are that good. So good, that you just want to devour them all by yourself, straight from the oven, afraid if you take them any further there won't be any more left to eat. And with that, my friends, I leave you with the best. biscuit. ever.

P.S. Pair with sausage gravy if you're feeling particularly indulgent.

Southern Biscuits 2
SOUTHERN BISCUITS
Source: Inspired by Shirley Corriher's "Touch of Grace" Biscuits
Yields: 6 biscuits

As much as I love the original recipe, I couldn't leave well enough alone. I have made significant changes to suit my tastes, which are reflected in the version below. To see my detailed notes, scroll to the end of the recipe. To view the unaltered version, follow the Food52 link below.

2 cups spooned and leveled SELF-RISING flour, preferably White Lily
2 tablespoons granulated sugar
3/4 teaspoon fine sea salt (or table salt)
1/4 cup very cold shortening
2 tablespoons very cold unsalted butter
2/3 cup heavy cream
1/2 cup buttermilk
1 cup plain ALL-PURPOSE flour, for shaping
Melted butter, for brushing

Preheat the oven to 425°F. Grease a cast iron biscuit pan (or use a cake pan according to Corriher's original recipe).

In a large mixing bowl, sift together the SELF RISING flour, sugar, and salt. Using the large holes on a box grater, grate the shortening and butter into the dry ingredients. Toss gently to evenly distribute the fats. Stir in heavy cream and buttermilk until the mixture becomes a very thick, wet batter (cottage-cheese texture, according to Shirley.)

Spread the ALL-PURPOSE flour into a shallow pan. Roughly divide the batter into 6 dough balls. Turn each ball around in the flour, dust off excess, and pat into the biscuit slots (there will be one empty one).

Bake the biscuits until they are light golden brown, about 17 - 20 minutes. Generously brush the hot biscuits with melted butter. Allow to cool in the pan for a few minutes, then remove with a small offset spatula or knife. Get 'em while you can!

My recipe notes and alterations:

- Reduced amount of sugar from 1/4 cup to 2 tablespoons
- Increased amount of salt by 1/4 teaspoon
- Added 2 tablespoons butter to the recipe in addition to shortening
- Reduced amount of buttermilk
- Changed baking equipment from cake pan to cast iron biscuit pan
- Included my personal method for grating cold butter & shortening into dry ingredients
Southern Biscuits 3
In Recipe Tags biscuits, buttermilk, Cast Iron, cream, drop, food, Food 52, Lodge, Recipe, Shirley Corriher, Southern, Touch of Grace
30 Comments

Recipe: Red Velvet Cupcakes

July 9, 2012 Nealey Dozier Thompson
Red Velvet Cupcakes with Cream Cheese Frosting

It was my intention to post these red velvet cupcakes before the Fourth of July. You know, so that maybe one of you could actually make them or something. Instead, life got in the way: I celebrated my final day at work, threw a dinner party, and jetted off to New England for a very-much-needed holiday.

I promised myself I would write a post on the airplane. But I slept. I vowed to steal a few minutes away from my cozy lounge chair by the infinity pool in order to blog. But I slept. Then, just like that, I was home again, where I swore up and down to get the recipe live if my future self depended on it. And what do ya know? Indeed, I slept some more. (Can you tell I needed a vacation?)

So here I am on day one of my new blogging adventure, finally sharing the recipe. Let's just pretend I made these cupcakes to celebrate my new career, shall we. Freedom from England, freedom from a restaurant job—practically the same thing, right? Anyways, it's not like a good Southerner ever needed an excuse to bake red velvet cupcakes.

Red Velvet Cupcakes with Cream Cheese Frosting
RED VELVET CUPCAKES
Source: adapted from Cakeman Raven via Food Network
Yields: 22 - 24 cupcakes

These cupcakes were a birthday/Independence Day request, and birthday requests are one thing I do not take lightly. Therefore I spent entirely too many hours researching red velvet recipes both online and in my cookbooks. As luck would have it, someone else did most of the dirty work for me. Thank you The Bake More for both this post and this post. Clearly you are a blogger after my own heart.

I barely tweaked the Cakeman Raven's red velvet recipe (the unanimous online favorite) to make cupcakes instead of a layer cake. Upon further digging, I discovered that Cakeman Raven's recipe is almost exactly the same as the cupcake versions of both Martha Stewart's and Paula Deen's. Whose came first we may never know...

So how were they? I really loved these red velvet cupcakes. Vegetable oil is a very common ingredient in Southern cakes and for good reason—there is nothing worse than a dry baked good. Next time, I may add a bit more cocoa powder and vanilla as many commenters suggested, but otherwise it is a solid recipe. Oh, and the cream cheese frosting is seriously the best I've ever made. It is the only one I will use from here on out!


For the cupcakes:
2-1/2 cups all-purpose flour
1-1/2 cups sugar
1 teaspoon baking soda
1 teaspoon table salt
1 teaspoon cocoa powder
1-1/2 cups vegetable oil
1 cup buttermilk, at room temperature
2 large eggs, at room temperature
2 tablespoons (1 ounce) red food coloring
1 teaspoon white distilled vinegar
1 teaspoon vanilla extract

For the frosting:
2 (8 ounce) packages cream cheese, at room temperature
4 cups sifted confectioners' sugar
2 sticks (1 cup) unsalted butter, at room temperature
1 teaspoon pure vanilla extract

For the cupcakes: Preheat oven to 350 degrees. Fill two muffin tins with cupcake liners.

In a large mixing bowl, sift together the flour, sugar, baking soda, salt, and cocoa powder. In the bowl of a stand mixer fitted with a paddle attachment, combine the oil, buttermilk, eggs, food coloring, vinegar, and vanilla and mix on medium low speed until well combined. Add the dry ingredients to the liquid ingredients and mix on medium low until a smooth batter has formed and no flour is visible.

Divide batter evenly among the cupcake liners, filling each 3/4 full. Bake for 20 minutes, rotating the pans halfway through cooking time, until the cupcakes are just done. Remove tins from the oven and cool cupcakes completely before frosting.

For the frosting: In the bowl of a stand mixer fitted with the paddle attachment, mix the cream cheese, sugar, butter, and vanilla on low speed until incorporated. Increase the speed to high and beat until light and fluffy, about 5 minutes (stopping occasionally to scrape down the sides of the bowl with a rubber spatula).

Frost the cupcakes—I piped my frosting using a large, closed-star tip—and top with assorted summer berries, if desired. Cupcakes will keep refrigerated in an airtight container for up to three days.

Note: The frosting recipe above yields enough to pipe the cupcakes, a technique that uses more frosting than if decorating with a spatula. If using a spatula (or knife), there will be excess. The recipe quantities can be reduced, if desired.

Red Velvet Cupcakes with Cream Cheese Frosting
In Recipe
6 Comments

Recipe: Southern Coconut Layer Cake

June 5, 2012 Nealey Dozier Thompson
Coconut Layer Cake-1

First and foremost, let me just start by saying this coconut cake is my masterpiece. But it didn't come easy. What you see here took lots (and lots) of licked fingers, too many slices to count, and a few more tears than I'd like to admit.

It all started out simply enough, when I decided to surprise Walt with an impromptu 30th birthday party on a particularly nondescript Sunday afternoon. In years past, the menus have been very much the same and always include my "famous" chocolate chip cookie cake. But milestones are milestones (no matter how hard we try to avoid them) and deserve something a bit more over the top. I took it upon myself to whip up the most impressive, most irresistible, most Southern cake I could think of—the one and only coconut cake.

To get started, I needed to do my homework. (It should be noted that when I take on a project like this, I demand perfection.) I trolled the many reputable food websites and culled through all of my cookbooks. I compared and contrasted and left no stone unturned. The sheer amount of recipes available to me was overwhelming, but I persevered and marched into battle ready to bake.

Unfortunately, all the research in the world does not guarantee a perfect cake. I learned this the hard way. I made a costly impulse decision, putting my usually hard-earned trust in the hands of a yet unproven cookbook (by a famous Southern chef, no less!), when I should have followed my instinct and chosen a more reputable source. Just ask Walt. Because he's the one who found me sitting alone and defeated on the kitchen floor, black streaks of mascara the only remaining proof of the tears I had shed. Three sullen, sunken cake layers glared down at me from the counter, a bittersweet reminder of how much I still have to learn.

I spent the next few hours feeling beaten up and broken down. I'm a pretty chill girl, but for some reason mistakes in the kitchen get me and they get me good. And it's cakes that always pack the hardest punch, it seems. So I decided to sleep on it. I knew a little rest would ease the pain, and then with the party only hours away I wouldn't have too much time to sulk, anyways.

Coconut Layer Cake-2

It's amazing what a good night's sleep can do. I woke up ready to bake, armed with a new recipe in hand. This time I went straight for Cook's Illustrated, which never lets me down in a moment of need. Sure enough, two golden, flat, and damn near perfect cake layers emerged from the oven safe from harm's way. Talk about a huge sigh of relief!

The final product was a piecemeal of recipes: a Food & Winebuttercream and a Martha cream cheese frosting. I even salvaged one cake layer from the previous day's disaster, which yielded a triple-stacked Southern beauty. My tragic coconut cake had gone from ugly ducking to beautiful swan in almost an instant.

Of course one of the major conversation starters at the party was coconut-gate 2012. But all the drama was forgotten as soon as it was time to blow out the candles and cut into the cake. The silence from my guests seemed to be a good sign. I took one bite and must admit that even I was impressed. (And I really am my worst critic, you know.) It was so good, in fact, that I didn't even get a moment to snap a blog-worthy photo, because every last slice was gone in the blink of an eye.

Since this recipe was too good not to share, I'm giving y'all a dessert encore, however this time around I made the recipe my own. I think you'll very much like the changes. Of course, three cakes in as many days is a lot for anyone—I'm going to need a short break from all things coconut, piña coladas not included. I truly hope you enjoy this coconut cake as much as Walt and I did. It was definitely a labor of love, but worth every single second of blood, sweat, and even those pesky tears.

coconut cake ii
COCONUT LAYER CAKE
Source: Nealey Dozier, adapted from Cook's Illustrated and Martha Stewart
Yields: 16 or more slices

I developed the base recipe of this 3-layer coconut cake after too-many-to-count hours of baking research, in addition to my previous testing using versions from both Cook's Illustrated and Bottega Favorita. It is a fairly traditional butter cake steeped with lots of extra coconut flavor, and yields a dense, super-moist crumb.

The filling, which I adapted from Martha Stewartvia Charleston's Peninsula Grill, is nothing short of spectacular. I think I went into shock from deliciousness upon my first taste from the bowl. Next time I'll probably double the recipe—half for the cake and half for me.

The frosting contains both butter and cream cheese; it has a slightly thicker texture than the filling and adds just a bit more tang. And last but not least, a coconut cake isn't a coconut cake without a cozy blanket of sweetened, shredded goodness. This cake must be the taste of heaven!


For the cake layers:
1-1/2 cups sweetened shredded coconut
13-1/2 ounces cake flour (approximately 3-1/4 cups, spooned and swept)
1 tablespoon plus 1 teaspoon baking powder
1-1/4 teaspoons table salt
1 (13-1/2 ounce) can coconut milk
1/4 cup + 2 tablespoons stirred, sweetened cream of coconut (such as Coco Lopez)
5 egg whites
1-1/2 teaspoons pure vanilla extract
1-1/2 teaspoons pure coconut extract
10-1/2 ounces granulated sugar (approximately 1-1/4 cups, spooned and swept)
8 ounces (2 sticks) unsalted butter, at room temperature
3 large eggs

For the coconut filling:
1-1/2 cups sweetened shredded coconut
4 ounces (1 stick) unsalted butter, cubed
1-1/4 cups heavy cream
3/4 cups granulated sugar
1 tablespoon cornstarch
1 tablespoon water
1 teaspoon vanilla bean paste or pure vanilla extract
Pinch of kosher salt

For the coconut frosting:
2 sticks unsalted butter, at room temperature
4 ounces cream cheese
2 teaspoons pure coconut extract
1 teaspoon vanilla bean paste or pure vanilla extract
1 (16 ounce) box confectioners' sugar
3 cups sweetened shredded coconut plus more as needed, for garnish

For the cake: Preheat the oven to 350 degrees. Generously coat 3 (9-inch) round cake pans with shortening and flour the pan, discarding the excess. (I use Baker's Joy, a shortening spray with flour added. It's fabulous!)

Place shredded coconut in the bowl of a food processor and pulse until very finely chopped.

In a large mixing bowl, combine the chopped coconut, flour, baking powder, and salt. In a separate bowl, whisk the coconut milk, cream of coconut, egg whites, vanilla, and coconut extracts until completely blended.

In the bowl of a stand mixer fitted with a paddle attachment, cream the sugar and butter on high speed until very light and fluffy, about 5 minutes. Reduce speed to medium-low and beat in the three whole eggs, one at a time, until well combined. Add the flour mixture, alternating with the coconut milk mixture, to the creamed butter, starting and ending with the flour.

Divide batter equally into the three prepared pans (I use a kitchen scale for accuracy). Bake the layers until they are light golden and set, and come out clean when pricked with a toothpick, approximately 35 minutes. Cool the cakes in the pans for 15 minutes. Cut around the edges with a pairing knife and remove the cakes to wire racks. Cool completely before moving forward with the recipe.

For the filling: Place shredded coconut in the bowl of a food processor and pulse until very finely chopped. Set aside.

In a medium to large saucepan, bring butter, cream, and sugar to a boil over medium-high heat. Cook, stirring occasionally, until the butter is melted and sugar completely dissolved.

Meanwhile, whisk the cornstarch, water, vanilla bean paste, and a pinch of salt together in a small bowl, then stir the mixture into the saucepan with the cream mixture. Bring cream back to a boil, stirring constantly. Once the mixture returns to a boil, cook for an additional minute or so, until just thickened.

Remove the saucepan from the heat and stir in the chopped coconut. Continue stirring for another minute or so to release some of the heat. Transfer the filling to a mixing bowl and cool at room temperature for an hour. Transfer to the refrigerator and chill, stirring occasionally, until cool, 3-4 hours (or overnight).

When ready to assemble the cake, beat the chilled filling with a handheld mixer on high speed until thick, light, and fluffy, approximately 1-2 minutes.

For the frosting: Place butter and cream cheese in the bowl of an electric mixer fitted with the paddle attachment (or with a hand mixer) and beat on medium speed until light and creamy. Turn mixer on low and add coconut extract and vanilla bean paste, followed by the confectioners' sugar. Continue beating until smooth, about 3 minutes.

To assemble the cake: Place one cake layer on a large plate or cake stand and coat with half of the coconut filling. Add the second cake layer and cover with the remaining coconut filling. Add the third cake layer. Frost the top and sides of the cake with a crumb coat of coconut frosting, followed by thicker layer. Thoroughly cover the frosted top and sides of the cake with shredded coconut, pressing gently to adhere it to the cake.

Kitchen tip: I recommend breaking this cake into steps—at least baking the cake layers ahead of time. The layers can be made up to three weeks in advance. If making two days in advance or less, just wrap each individual layer tightly in plastic wrap and tuck into a large Ziploc bag. Store the cakes on the counter at room temperature. To store the layers longer than two days (and up to three weeks), wrap a layer of aluminum foil around the layer of plastic wrap before freezing. Allow layers to thaw to room temperature before continuing with the recipe. The frosted cake will keep three or four days in an airtight container.
In Recipe Tags buttercream, cake, coconut, Cook's Illustrated, food, layer, Peninsula Grill, Recipe, Southern, three
18 Comments
← Newer Posts Older Posts →

Powered by Squarespace