Pearls of Wisdom: Extra Crispy Wings

Simple is best. When it comes to cooking that is usually the case, however behind every great chef lies a few well-kept secrets. Thankfully, I love nothing more than uncovering their hidden gems. I am constantly tampering with obscure ingredients from sometimes-shady internet sources. (Like, there may or may not be contraband vanilla extract in my pantry that arrived in an unmarked envelope from the depths of Mexico...)

So what's the secret to extra crispy wings?

Experimenting with thickeners and starches is (strangely) thrilling to me, so I was stoked when I read this "trick" to extra crispy wings from Scott Heimendinger, director of applied research for Modernist Cuisine. Heimendinger tosses marinated chicken wings with a combination of potato starch and Wondra flour—two of my favorite ingredients—to get the ultimate in crunchy texture. This starchy coating forms a barrier against moisture that allows the meat to stay juicy while the skin becomes extra crisp. Even better, the Wondra holds its strength, meaning your wings (if by fluke there are any leftover) will be just as good out of the refrigerator as they were out of the fryer!

CHECK OUT HEIMENDINGER'S FULL RECIPE HERE


(Chicken joints around Atlanta better watch out come Super Bowl Sunday—this technique paired with a bottle of Slap may very well rock the wing-frying world!)


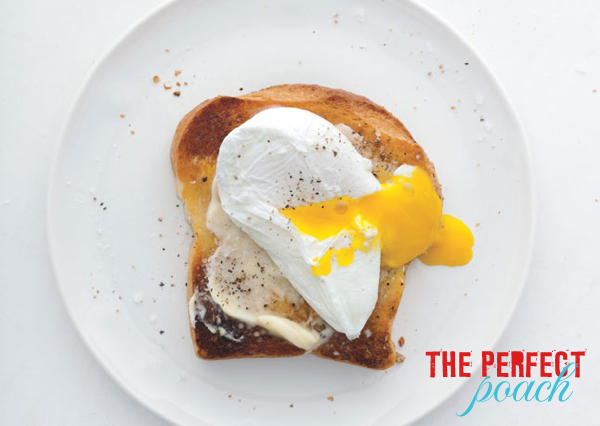
Pearls of Wisdom: How to Poach an Egg

I eat a single poached egg on sour dough toast—with kosher salt, freshly ground black pepper, and a generous dousing of Cholula—almost every single morning of every single day. The only exceptions are when I am making Walt cottage cheese pancakes or whipping up breakfast bread pudding for a crowd. This predictable pairing, along with a homemade mocha with lots of frothy milk, is what helps me start even the busiest of days.

I am also a sucker for any and all Eggs Benedict, like my Lightened Up version (with turkey bacon, spinach, and tomatoes) featured on The Kitchn today, or my Eggs Florentine (in hash brown nests!) from a few months back. By now I'm pretty sure I have the egg poaching technique down pat, so I thought I'd share my tricks to the trade:

How to poach an egg: Fill a medium saucepan with about 2 inches of water and a glug of cider vinegar. Bring the water to a boil then reduce heat to medium-low, letting the water maintain a few small, occasional bubbles. Crack 1 egg into a small dish (a small sake cup works perfectly), making sure not to break the yolk.

Using a whisk, vigorously stir the water to create a tornado-like vortex. Partially submerge the cup and slip the egg into the moving water. (The vortex will help wrap the white around the yolk, forming the perfect shape you see in restaurants.) Cook the egg until the whites are set and opaque, but yolks are still runny, about 2 minutes.

Remove the egg with a slotted spoon to a paper towel-lined plate. Gently pat dry with additional paper towels and trim any excess whites. Continue with additional eggs, if desired. If poaching a few, just slip them all back into the simmering water for about 20 seconds to rewarm before serving.

And there you have it, a perfectly poached, incredible edible egg! I am always looking for new ways to eat poached eggs; do you have any good recipes that include them?

(Image source: Bon Appetit)


Pearls of Wisdom: Which Starch for What?

I made three batches of corn soup last week in less than three days time. Sweet Walter purchased me the Vitamix blender I've been eying for years as an early birthday present, and I was eager to test out its power. But in my attempt to develop a restaurant-worthy summer soup, I hit a few (culinary) speed bumps along the way.

I initially set out to create a recipe that was the essence of sweet corn, with no underlying flavors getting in the way. Because I didn't add potatoes or start with a roux—in addition to the power of the Vitamix—my soup came out much too thin for my liking. Which brings us to thickening agents. Y'all know I like to get all "scientist-y" every now and then, so I decided to think outside the yellow cornstarch box.

I thickened my first batch of soup with potato starch after reading this article from The Kitchn. (My girl Sarah Rae knows her stuff, so I took the info to heart.) Potato starch is made in two steps: first, the potatoes are peeled and ground. Next, they are washed to remove the starch, which in turn is dried to yield 100 percent potato starch. It should be added at the end of cooking (as opposed to at the beginning, like flour) and doesn't alter the taste of a dish like other thickeners can.

Upon first eating my now-delicious-and-rich corn soup, I was really happy with the results. So much so, I thought I struck recipe gold on the very first try. But after leaving the soup at room temperature for about an hour, I re-tasted it only to find blobs of gel at the bottom of the soup. I had read somewhere that potato starch was more apt to resist congealing upon cooling than other starches, so I wondered if I had done something wrong?

I preformed test two and three at the same time, using the same base recipe as test one. For test two, I added one peeled, diced russet potato to the corn & vegetables at the same time I added the stock. The potato was pureed with the rest of the soup to yield a more substantial texture requiring no additional thickeners. I really, really liked the soup, but there was definitely a hint of potato flavor, making my soup more "chowdery" than I would have liked; I wanted silky, glossy, and smooth.

Enter tapioca starch (also known as tapioca flour), a thickener made famous in its use in puddings and pies. Tapioca starch has been gaining popularity in restaurant kitchens for its many positive qualities—it thickens at a low temperature, remains stable when frozen, and imparts a glossy sheen to its finished products. And while "instant tapioca" can have trouble dissolving, leaving behind small gelatinous blobs, tapioca starch is so finely ground it does not have this same problem.

I added the tapioca starch (two tablespoons cornstarch to three tablespoons water) into my soup just a few minutes before serving and was amazed at the instantaneous results. The texture was like velvet and the taste was of pure corn. Even better, the soup kept its shape after a few days in the fridge. (What, did you think I could actually eat three batches of soup in a day?) All my requirements having been met, I think I found a winner.

Of course, I don’t consider myself an expert on the subject of thickening starches; in fact, I know I have a lot more experimenting to do before I will have a complete grasp on them all. But I look forward to learning more, especially with this yellow cake that uses potato starch on my radar. I also want to play around with xanthan gum and clearjel, so look out for more lab results soon!

In the mood to dork out on starches? Here are some additional sources:

All About Thickeners (Baking 911) What's the Difference? Flour, Cornstarch, Potato Starch, and Arrowroot (The Kitchn) How Do Chef's Stabilize Sauces? (Google Answers) Two Thickeners: Tapioca and Cornstarch (Cook's Illustrated)

P.S. Check out the Sweet Corn Soup over at The Kitchn

Image SourceKing Author Flour

Pearls of Wisdom: All About Salt

All about salt

Does anyone remember when the only choice of salt available was Morton's plain or iodized? Home cooking (and cooks) have come along way since then, and the market for gourmet goods reflects that. Now you can choose between table, kosher, or sea salt at the very minimum, not to mention the myriad of flavored and infused salts that currently flood the shelves. It can all be a little overwhelming if you ask me.

I only keep a minimal stash around, and that's how I prefer it. I have received some pretty "out there" salt as gifts— including bourbon salt and bacon salt—that I have no clue how to use. That said, I have learned a few important tips about salt over the years. Here is what you definitely need to know:

1. Which salt when: With what seems like hundreds of options to choose from, here are the three salts I always have on hand.

Kosher salt is a large-grained, flaky salt that is mild in flavor and additive-free. Like most enthusiastic cooks, I use it almost exclusively for my day-to-day cooking. Its larger texture makes it easy to pinch and allows it to better adhere to food.

Table salt has a finer grain than kosher and is quite often fortified with iodine, which can leave a bitter taste. The only time I use table salt is in baking and dessert recipes, since its smaller size allows it to absorb more easily into batters and doughs.

Sea salt (or Fleur de Sel), like kosher salt, has thin, flaky layers but a more intense salty taste. I use it as finisher on salads, pasta, and meats, when the appearance of the flakes—in addition to their flavor—enhances the end result.

2. Season as you go: Most recipes call only for salt and pepper at the very end, which seasons the surface of the dish but not the individual components within. For the most balanced flavor, it is imperative to salt layer by layer, beginning to the very end.

Say you're making a stew: you will need to salt the meat before searing, the vegetables while sauteing, and the liquids once combined. By the time the stew is finished cooking, all that's left to do is adjust the final seasonings to taste. Since the layers of the dish have already been salted, you shouldn't need to overcompensate in the end.

3. Trust your taste:  To best season a dish, let your instinct be your guide. The purpose of salt is to bring out the flavors of a dish, not to overpower them. In fact you shouldn't even know the salt is there. It may sound scary at first, but it just takes a little bit of practice.

Once you learn how how much salt and when, you'll never have to be married to a recipe again. Start with a little at a time—you can always add more but you can't take it back. And always sprinkle salt from high above, about a foot, so that it disperses evenly as opposed to landing in a concentrated spot. (A wise tip from Mr. Keller himself.)

...

I used to be chained to recipes, but learning to trust myself is really what opened my door as a cook. And after working in restaurants and alongside a few chefs, I am a zealous, if not overconfident, seasoner. Plenty of salt (in addition to quality ingredients) really does make the difference from good to great!

Now what about you? Any great tips or secrets for using salt that you'd like to share?

Image source: Gawker


Pearls of Wisdom: All About Butter

All about butter Once upon a time, I thought it was okay to purchase "buy-one-get-one-free" off-brand butter. It costed a considerable amount less than its competitors, and seriously, how different from the big names could it really be? (Answer: very.) Turns out there was lot about butter I didn't know. Unfortunately I learned the hard way, and after a few less-than-stellar baking experiences discovered that you really do get what you pay for. If only someone had told me sooner! So to spare you the same grief,

Here are a few things every cook should know ABOUT BUTTER:

1. Not all butter is created equal: Butter is primarily composed of milk fats and water. Cheap butter contains more water and less fat than higher-end brands, creating an inferior product capable of altering an otherwise decent recipe. High quality, high fat butter yields tender baked goods, crisp pastries, and creamy icings. I am a firm believer that good ingredients equal good results, and great ingredients equal great results; sometimes it is worth paying the extra couple of dollars if you strive for the very best.

2. Salted or unsalted, that is the question: My mother used salted butter, so for a while I used salted butter, too. (Mom knows best, right!) Thank goodness my wise friend Amelia showed me the low-sodium light. Salt is often added to butter to cover up inferior taste and to increase its shelf life. The amount added can vary substantially from brand to brand, so you never know what you're going to get from stick to stick. On the flip side, unsalted "sweet" butter has a delicate, nutty flavor, and because it contains no added salt, you can control the amount that goes into your recipes.

3. Fridge, freezer, or counter top: I forgot to buy butter once only to realize it midway through a recipe; bystanders would have thought it was literally the end of the world. In true Scarlett fashion, I vowed to never run out of butter again! Well-wrapped unsalted butter keeps in the refrigerator for about three months, or up to six months in the freezer if need be. I always keep some butter at room temperature (which keeps for a minimum of 3-4 days) for bagels and such; this Anthropologie butter dish is perfect because it holds just half a stick—turnover is quick so I never have to worry about it going bad.

4. Cooking with butter: Butter has a low smoke point, which basically means it scorches at a lower temperature than say, peanut oil. This can be a good thing if you are making a simple sauce ("brown butter" makes everything better!), but bad if you are cooking foods on high heat. If you want to pan-fry foods in butter, it is best to clarify it first. Clarified butter is the process of removing the milk solids (which are the reason butter burns) by melting it over low heat, causing the solids and fat to separate. The solids are discarded, and you are left with pure butter fat which can be heated to a much higher temp.

5. Baking with butter: Is it just me, or am I the only one that starts a recipe only to realize once it's too late that it calls for softened butter? Such a bummer! Whatever you do, try to avoid the microwave, because it will cause uneven heating throughout. If a recipe calls for softened butter, leave it at room temperature for several hours or overnight. It should be cool (not melted or greasy) and hold a firm impression when poked with your finger. If the microwave is your only option, try this tip: cut the butter into smaller pieces and heat on medium power, in 30 second increments, until it is malleable.

Dixie Caviar recommends: Land O' Lakes (unsalted) for all-purpose use, Plugra European-style (unsalted) for baking, and Kate's Homemade Butter (with sea salt) for toast and bagels.

Image source: Fabulous Foods