New Orleans is perhaps my favorite city in the country, but it's the last place I'd want to be during Mardi Gras. I just don't get too excited about raucous bars and dirty streets, and I'm definitely not looking to add any plastic beads to my jewelry collection. (Give me Jazz Fest any day!) But I never need an excuse to cook up some spicy Creole cuisine and Fat Tuesday is as good a day as any. Or rather, "Fat Sunday," as we celebrated with a little family gathering over the weekend since we'd all be indisposed during the work week. I think Tina Thompson and "krewe" did Louisiana proud if I may say so myself.
Walt's little brother whipped up a batch of Hurricanes to get the celebratory juices flowing. A vat of spicy corn dip almost ended the party before it even started (Caroline, if you are reading this: oh-my-God-that-stuff-was-mind-blowingly-amazing), but somehow we managed to keep our appetites in check for the main event. For dinner, we overindulged in two different styles of seafood gumbo—a gumbo dual, if you will—as well as creamy crawfish pasta, grilled herb-butter shrimp, and pan-fried crab cakes. I'm still full even thinking about it! Nah, we don't mess around at the Thompson house. At least not when it comes to food and booze.
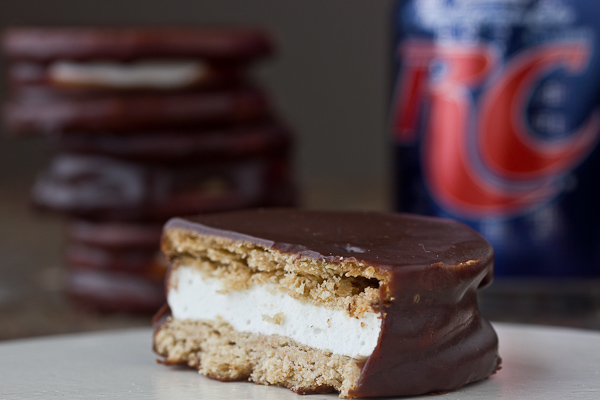
For the grand finale, I went all out and baked up some homemade MoonPies. In Mobile, MoonPies are typically thrown to parade revelers as party favors; they make a good, i.e. soft, replacement of the more dangerous boxes of Cracker Jacks pelted at the crowds of yesteryear. I grew up eating these famous Southern treats not at any wild and crazy Mardi Gras parties but in the parking lot of the Bread & Buggy, our neighborhood country store. (What can I say, I am from Alabama. You can't even make up a name like that.) Looking back, we were a walking redneck cliché: my dad slinging back his boiled peanuts and his like-minded daughter armed with a fistful of MoonPies and a can of RC Cola. It's crazy how much hasn't changed. Well, except for the fact that now I'm making them from scratch...
Source: Nealey Dozier**
Yields: approximately 18 MoonPies (will vary with size of the cookie cutter)
Basically, a MoonPie consists of two graham cracker cookies stuffed with a creamy marshmallow filling and dunked in a bath of chocolate. Store-bought are good, homemade are great! This recipe is definitely a labor of love, but a fun one. It's not technically difficult, it just involves a little bit of patience. I'd give yourself a relaxed weekend afternoon to pull it all off. And don't wait for Mardi Gras to make these; Moon Pies should be enjoyed year round. (They're especially good in banana pudding!)
For the cookies:
1 1/2 cups all-purpose flour
1 cup whole wheat flour
1/2 teaspoon baking powder
1/2 teaspoon table salt
1 cup (2 sticks) unsalted butter, softened
3/4 cup light brown sugar
1/2 teaspoon pure vanilla extract
For the marshmallow filling:
2 packets unflavored gelatin powder
3/4 cup water, divided
3/4 cup granulated sugar
1/4 cup corn syrup
Pinch of salt
2 teaspoons pure vanilla extract
For the chocolate coating:
8 ounces good-quality semisweet or milk chocolate, chopped
8 ounces (1 cup) heavy cream
For the cookies: Combine the all-purpose flour, whole wheat flour, baking powder, and salt in a medium bowl.
In the bowl of a stand mixer (or with a handheld mixer), cream together the butter and sugar on medium speed until light and fluffy, 2 - 3 minutes. Add the dry ingredients and beat on low speed until a thick dough has formed, about 1 minute. Divide the dough in half and press each half into a flat disk. Wrap in plastic wrap and refrigerate until firm, at least one hour or up to one day.
Preheat oven to 350 degrees F and line two baking pans with parchment paper. On a floured surface, roll out a disc of dough to about 1/8-inch thick. Using a 2 1/2-inch biscuit cutter, cut out rounds of dough and place on the baking sheet. Gather scraps of dough and re-roll to cut out additional cookies. Continue with the other disc of dough.
Refrigerate the cookies for 10 minutes before baking, then bake for 12 minutes. Remove from the oven. Leave on baking sheets for a few minutes, then transfer to a cooling rack and allow to cool completely.
For the marshmallow filling: Whisk together the gelatin and 1/2 cup cold water in a small bowl and set aside. Fit a pastry bag with a large, round tip.
Stir together 1/4 cup water, sugar, corn syrup, and salt in a medium saucepan. Bring the sugar mixture to a boil over medium-high heat. As it’s coming to a boil, dip a pastry brush in water and brush down the sides of the pot to remove any sugar stuck to the sides. Once the temperature reaches 225 - 230 degrees, microwave the gelatin on high until melted, about 20 - 30 seconds. Pour it into the bowl of a stand mixer fitted with the whisk attachment and set on low speed.
When the syrup reaches 240 degrees, remove from the heat and slowly pour it into the mixer bowl. Increase the speed to medium and beat for 5 minutes. Increase to medium-high and beat for 5 more minutes. Add the vanilla and beat on highest speed for 1 more minute. Using a silicone spatula or greased spoon, scoop the marshmallow filling into the prepared pastry bag. Working quickly, pipe a generous mound or "kiss" onto the center of a cookie; top with another cookie, pressing firmly to disperse the marshmallow evenly.
For the chocolate coating: Combine the chocolate and cream in a heatproof bowl set over (but not touching) a pot of simmering water, stirring occasionally. Once the chocolate is melted, whisk until the mixture is glossy and completely combined. Reduce the heat to low; you want the chocolate to stay warm and malleable while coating the cookies.
Place a few sheets of parchment paper under a wire cooling rack. Using an offset spatula, drop a marshmallow-filled cookie into the chocolate and flip a few times to coat thoroughly. Tap the spatula against the bowl a couple of times to allow the excess coating to drip off, smoothing the top of the cookie with another spatula if necessary. Place the coated cookie on the wire rack. Continue coating the rest of the cookies, adjusting the temperature of the water as necessary in order to keep the chocolate a "pourable" consistency. (Here's a helpful video about coating the cookies; skip to the 13 minute mark.)
Allow the cookies to sit at room temperature until the coating is set, preferably overnight. You can refrigerate them to speed up the process, although it may alter the texture of the coating/cookie. Store the moonpies in an airtight container in the refrigerator or in a cool place, separated by parchment paper to prevent sticking.
**I created my version of homemade MoonPies after doing considerable research of other online recipes available. The cookie base is loosely adapted from The Pastry Queen Cookbook via Confections of a Foodie Bride, the marshmallow recipe is my own, and the chocolate ganache is adapted from Fine Cooking.


