• Recipes
  • Blog
  • About
  • Services
  • Search
Menu

Dixie Caviar

Street Address
City, State, Zip
Phone Number
A New Kind of Southern

Your Custom Text Here

Dixie Caviar

  • Recipes
  • Blog
  • About
  • Services
  • Search

Recipe: Mozza's Meatballs al Forno

May 17, 2012 Nealey Dozier Thompson
Mozza Meatballs-2

I've read enough food writing to know that way up North, Italian transplants and their offspring love a good Sunday sauce. The stories are often the same, a nostalgic reflection of nonna cooking up her famous meatballs and lasagna for the entire family gathered around the table. I must admit, the prose is often sweet enough to make this Southern girl want to move to Jersey. Well, almost...

Instead, I'll just have to make myself some meatballs. Considering I didn't grow up with a secret family recipe, it's taken me quite some time to find one I deemed worthy of all the sentimental hype. But then I tried these. And these just might give Italian grandmothers everywhere a run for their olive oil.

Leave it to The Mozza Cookbook, of Nancy Silverton fame, to be the keeper of the ultimate meatball recipe. When I lived in Los Angeles, Mozza was just two blocks from my Melrose apartment. You couldn't get a dinner reservation to save your life, but if you got there early enough at lunchtime you could experience the wonder that is their burrata caprese or prosciutto di parma pizza. It seems everything Nancy touches turns to culinary gold.

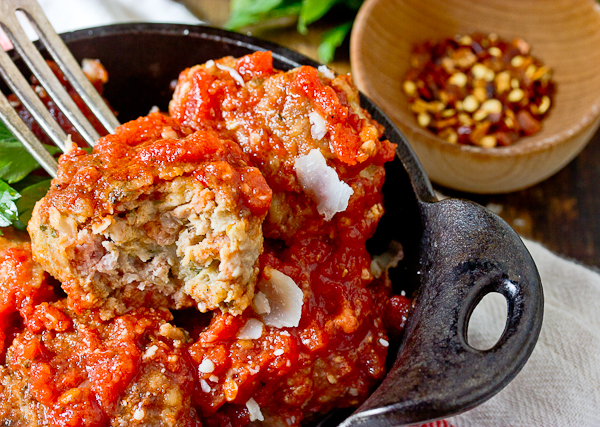
So yes, the Mozza meatballs were quite divine: I served them with spaghetti and a lightly dressed arugula salad. It was pure dinner-time bliss. Were they a good idea to make on a Wednesday? Probably not. Turns out there's good reason to make them on a weekend. (It's called time.) But tomorrow's meatball subs might make me forget that tiny little detail. And the meatball margherita pizza come Friday? All is forgiven. Heck, maybe I'll even make them again on Sunday, to share with those I love.

Mozza Meatballs Recipe
MOZZA'S MEATBALLS AL FORNO
Source: adapted from The Mozza Cookbook by Nancy Silverton
Yields: 24 - 28 meatballs

These meatballs are as promised—light, tender, and packed with flavor. Definitely the best I've ever made! To handle the large yield when frying them, I used my trusty industrial-sized saute pan purchased from a restaurant supply store. It was $30 very well spent. The passata recipe makes a delicious all-purpose tomato sauce. I'm certain, In fact, that it is going to be my go-to recipe from here on out. There's no hidden "chef" ingredients lurking; just be sure to use the best quality canned tomatoes you can find and your favorite extra virgin olive oil.

For the passata di pomodoro:
2 (28-ounce) cans whole peeled tomatoes, preferably San Marzano
1/4 cup good-quality extra virgin olive oil
1 tablespoon sugar, plus more to taste
1 scant tablespoon kosher salt
1 heaping teaspoon freshly ground black pepper

For the meatballs:
1 pound ground pork (preferably pork butt)
1 pound ground veal
6 1/2 ounces pancetta
3/4 cup diced day-old, crustless bread
1/4 cup whole milk
1 1/2 cups freshly grated Parmesan (about 6 ounces), plus more for grating
1/2 large onion, minced (about 1 cup)
2/3 cup finely chopped Italian parsley
4 large garlic cloves, minced
2 extra large eggs, lightly beaten (or 2 1/2 large eggs)
1 teaspoon red pepper flakes, or more to taste
2 teaspoons kosher salt
1 teaspoon freshly ground black pepper

For cooking:
1 cup all-purpose flour, for dredging
1/4 cup extra virgin olive oil, plus more as needed
1 quart Passata de Pomodoro (recipe above) or tomato sauce
1 quart (32 ounces) chicken stock
3 dried bay leaves
3 dried arbol chiles, optional

For the passata di pomodoro: Set a food mill fitted with the coarse disc over a large bowl. Pass the tomatoes with their juices through the mill and set aside. In a large saute pan, heat the olive oil over medium-high heat until very hot but not smoking. Slowly add the pureed tomato into the pan, using caution to prevent splattering. Stir in the sugar, salt, and pepper. Continue to cook at medium-high heat, stirring occasionally, for 30 minutes, until the sauce becomes thickened.

For the meatballs: Remove the pork, veal, and pancetta from the refrigerator and let come to room temperature, about 30 minutes. Finely chop or mince the pancetta in a miniature food processor.

Soak the diced bread cubes in milk for 5 minutes. Meanwhile, combine the Parmesan, onion, parsley, garlic, eggs, red pepper, salt, and pepper in a large bowl and mix thoroughly. Add the pork, veal, and pancetta to the Parmesan mixture and gently combine with your fingertips until just mixed. (Over-mixing or squeezing the meat will create tough meatballs.)

Place flour in a shallow bowl. Use a spring-form ice cream scoop to measure out your desired size meatballs (I like very large meatballs; the recipe suggests 2 ounces), and gently form a ball using the palms of your hand. Sprinkle a little flour on all sides of the meatball to form a light coating, shaking excess flour back into the bowl. Set the meatball on a sheet pan and repeat with remaining meat. Cover the pan with plastic wrap and refrigerate for a minimum of one hour, which is necessary for the meatballs to retain their shape while cooking.

Preheat oven to 350 degrees. In a large oven-proof saute pan, heat olive oil over medium-high heat until very hot but not smoking. (There should be about 1/4" of oil in the pan, so add more if necessary.) Working in 2 - 3 batches, add half the meatballs—making sure not to crowd the pan—to the hot oil and sear, flipping once, until they are golden brown, approximately 6 minutes. Return the seared meatballs to the sheet pan. Allow the oil to reheat, adding more if necessary. Repeat with remaining meatballs.

Discard the oil and wipe out the saute pan. Nestle the meatballs back in the pan. Stir together the passata and chicken stock in a pitcher or large bowl. Pour enough of the liquid to cover the meatballs and fill the bottom of the pan, but do not drown them (I used just a little over half and reserved the rest for reheating the meatballs later.) Braise the meatballs in the oven, uncovered, for one hour, until they are golden brown. Serve by themselves, or with spaghetti and garlic bread. Garnish with freshly grated Parmesan.

To reheat leftover meatballs, bring meatballs and reserved sauce to a gentle boil in a saute pan. Reduce heat to low and simmer until the meatballs are warmed through.

In Recipe Tags braised, meatballs, Mozza restaurant, Nancy Silverton, pork, Recipe, tomato sauce, veal
3 Comments

Recipe: Knorr Spinach Dip, Two Ways

May 10, 2012 Nealey Dozier Thompson
Knorr Spinach Dip

I am a lover of spinach dip. And I mean all spinach dip. Houston's, the upscale chain restaurant, lays claim to the holy grail of recipes, and I have spent many sleepless nights researching Copycats. I have a friend who once participated in their management program—all she would admit to was fresh spinach and really good Parmesan. I was eventually brave enough to attempt a version of my own. It was delicious. But Houston's it was not.

Then there's Publix brand spinach dip, found in the deli section. It has been to countless parties with me and there's never a bite left. It's not often that I admit kitchen defeat, especially by a supermarket, but they really just do it better. (Oh boy, that was hard to admit.) I went to pick up a container before work just last week; apparently so did every other Atlantan, since they were all sold out. I resorted to the lowly spinach-artichoke. I sulked all the way out of the store, and continued sulking well into my shift.

Lastly there's Knorr spinach dip, made by dumping a package of powdery ingredients, half of which I can't even pronounce, into a mountain of mayonnaise and sour cream. I don't usually blog recipes that come from a box—although I'm perfectly content enjoying them on occasion—but hot dang, it's a classic too good not to share. (Not to mention I grew up eating it, so it's got that extra nostalgia factor for me.) You may have even made this dip at some point, or at least tasted it a time or two, but here's a friendly reminder to put it back on the top of your favorite's list. It's always at the top of mine.

Knorr Spinach Dip 2
KNORR SPINACH DIP, TWO WAYS
Source: Knorr Vegetable Recipe Mix
Yields: 4 cups

This dip is perfect just the way it is; there's no need to veer from the back of the package. (I did consider making the herb mix from scratch, but then I figured I should leave well enough alone.) l recently decided if it's so delicious cold, it must be pretty amazing hot, too. I divided a single batch between two mini cast iron skillets. I mixed shredded mozzarella into one skillet and sprinkled some more on top, and baked it until it was oozing and golden. It was pure baked spinach dip bliss.

1 (10 ounce) package frozen spinach
1 (16 ounce) container sour cream
1 cup mayonnaise
1 package Knorr Vegetable Recipe Mix
1 (8 ounce) can water chestnuts, drained and chopped

For chilled spinach dip: Cook spinach according to package directions. Drain and squeeze out excess water with paper towels until dry. Combine spinach, sour cream, mayonnaise, vegetable mix, and water chestnuts. Stir until completely combined and chill for at least 2 hours. Serve with pita chips, toasted crostini, and crudités.

For baked spinach dip: Preheat oven 350 degrees. Stir a large handful of shredded mozzarella cheese into the prepared dip and pour into an oven proof baking dish. Sprinkle the top with additional mozzarella, to taste. Bake for 30 - 35 minutes, until cheese is melted and golden brown. Let cool for a few minutes before serving. Serve with tortilla chips, salsa, and sour cream

Knorr Spinach Dip 3
In Recipe Tags appetizer, artichoke, Baked, dip, Houston's, Knorr, publix, Recipe, Southern, spinach
9 Comments

Recipe: Rigatoni Macaroni & Cheese

April 11, 2012 Nealey Dozier Thompson
Community Q Rigatoni Macaroni & Cheese

Why hello there, stranger! Let's please not talk about my little absence here on DC and get right to the fun stuff, okay. When did April get here anyways? And spring? Holy crap, time is flying by at a rapid pace. To make amends, I'll just go ahead and give you the best macaroni and cheese recipe known to man and all will be forgiven. You've got to trust me on this one, you know I don't throw out superlatives like that often. But seriously. It's holy-crap-mind-blowingly-out-of-this-world-too-good-to-be-true amazing. Need proof? Here's the text message following a cell phone snapshot to my sister (and I don't lie to my sister):

Me: Mac and cheeeessse, please! (Photo attached)Deanna: Oh my gawwwwddddddddddddMe: It's pretty much the best thing I have ever tasted ever. E-V-E-R.

This was immediately followed by a call from her offering to fly me to Los Angeles to make it. (Dee—I'll see you in two weeks!)

Seriously though, I don't know how Dixie Caviar has survived this long without a recipe for mac and cheese. I've been searching for the holy grail of recipes for years and am happy to say my search is over. But I'll just stop blabbering now and give you the cheesy goods. (P.S. Thank you notes and flowers for the fabulous recipe can be sent to my home address in Atlanta.)

Rigatoni Macaroni and Cheese-4
RIGATONI MACARONI AND CHEESE
Source: Adapted from Community Q, Atlanta
Yields 6-8 servings

This recipe comes from Community Q Barbecue in Decatur, GA. The first time I ever dined there, I spent $40. On myself. I couldn't tell if the man behind the counter wanted to marry me or call the asylum. What can I say? I have to sample ALL of the wares to fairly judge a barbecue joint. It's safe to admit that it is now my one-and-only bbq house. (Thank goodness the 20-minute drive is just long enough to keep me out of there on a regular basis.)

Community's beef ribs and rigatoni mac & cheese will change your life. So you might imagine my surprise when I stumbled upon their so-called recipe in the Atlanta paper for all the world to see. I had my doubts that it was THE recipe, but upon testing—multiple times—am happy to report that this is, in fact, IT. I've only made one big change, and that is substituting the originally called-for Monterey Jack with (uber-processed) white American. Hey, if Panera Bread can do it, so can I.


1 (16-ounce) box rigatoni noodles
8 ounces (12 slices) white American cheese, torn or cut into very small pieces
8 ounces shredded sharp cheddar cheese, divided
4 ounces grated fresh Parmesan cheese, divided
2 cups heavy cream
Kosher salt and freshly ground pepper, to taste

Preheat oven to 350 degrees. Bring a large pot of water to boil and season generously with salt. Add the pasta and cook until just tender, about 12 minutes or according to package instructions. Drain in a colander without rinsing, and return the pasta to the pot.

Add the American cheese, half of the cheddar, half the Parmesan, and the heavy cream to the still-warm noodles and stir until combined and the cheese starts to melt. Season generously with salt and pepper, to taste. Pour the noodle mixture into a greased cast iron skillet or casserole dish. Sprinkle remaining half of cheddar and Parmesan over the top and bake until bubbly and golden, about 30 - 40 minutes. Remove from the oven and cool for about 10 minutes before serving.

Serve, eat copious amounts, and then retreat for a long afternoon slumber.

Rigatoni Macaroni and Cheese-3
In Recipe Tags Atlanta, Baked, BBQ, cheese, Community Q, food, macaroni, Recipe, rigatoni, Southern
7 Comments

Recipe: Homemade MoonPies

February 22, 2012 Nealey Dozier Thompson
Homemade Moon Pies-2

New Orleans is perhaps my favorite city in the country, but it's the last place I'd want to be during Mardi Gras. I just don't get too excited about raucous bars and dirty streets, and I'm definitely not looking to add any plastic beads to my jewelry collection. (Give me Jazz Fest any day!) But I never need an excuse to cook up some spicy Creole cuisine and Fat Tuesday is as good a day as any. Or rather, "Fat Sunday," as we celebrated with a little family gathering over the weekend since we'd all be indisposed during the work week. I think Tina Thompson and "krewe" did Louisiana proud if I may say so myself.

Walt's little brother whipped up a batch of Hurricanes to get the celebratory juices flowing. A vat of spicy corn dip almost ended the party before it even started (Caroline, if you are reading this: oh-my-God-that-stuff-was-mind-blowingly-amazing), but somehow we managed to keep our appetites in check for the main event. For dinner, we overindulged in two different styles of seafood gumbo—a gumbo dual, if you will—as well as creamy crawfish pasta, grilled herb-butter shrimp, and pan-fried crab cakes. I'm still full even thinking about it! Nah, we don't mess around at the Thompson house. At least not when it comes to food and booze.

For the grand finale, I went all out and baked up some homemade MoonPies. In Mobile, MoonPies are typically thrown to parade revelers as party favors; they make a good, i.e. soft, replacement of the more dangerous boxes of Cracker Jacks pelted at the crowds of yesteryear. I grew up eating these famous Southern treats not at any wild and crazy Mardi Gras parties but in the parking lot of the Bread & Buggy, our neighborhood country store. (What can I say, I am from Alabama. You can't even make up a name like that.) Looking back, we were a walking redneck cliché: my dad slinging back his boiled peanuts and his like-minded daughter armed with a fistful of MoonPies and a can of RC Cola. It's crazy how much hasn't changed. Well, except for the fact that now I'm making them from scratch...

Homemade MoonPies_ed-3
HOMEMADE MOONPIES
Source: Nealey Dozier**
Yields: approximately 18 MoonPies (will vary with size of the cookie cutter)

Basically, a MoonPie consists of two graham cracker cookies stuffed with a creamy marshmallow filling and dunked in a bath of chocolate. Store-bought are good, homemade are great! This recipe is definitely a labor of love, but a fun one. It's not technically difficult, it just involves a little bit of patience. I'd give yourself a relaxed weekend afternoon to pull it all off. And don't wait for Mardi Gras to make these; Moon Pies should be enjoyed year round. (They're especially good in banana pudding!)

For the cookies:
1 1/2 cups all-purpose flour
1 cup whole wheat flour
1/2 teaspoon baking powder
1/2 teaspoon table salt
1 cup (2 sticks) unsalted butter, softened
3/4 cup light brown sugar
1/2 teaspoon pure vanilla extract

For the marshmallow filling:
2 packets unflavored gelatin powder
3/4 cup water, divided
3/4 cup granulated sugar
1/4 cup corn syrup
Pinch of salt
2 teaspoons pure vanilla extract

For the chocolate coating:
8 ounces good-quality semisweet or milk chocolate, chopped
8 ounces (1 cup) heavy cream

For the cookies: Combine the all-purpose flour, whole wheat flour, baking powder, and salt in a medium bowl.

In the bowl of a stand mixer (or with a handheld mixer), cream together the butter and sugar on medium speed until light and fluffy, 2 - 3 minutes. Add the dry ingredients and beat on low speed until a thick dough has formed, about 1 minute. Divide the dough in half and press each half into a flat disk. Wrap in plastic wrap and refrigerate until firm, at least one hour or up to one day.

Preheat oven to 350 degrees F and line two baking pans with parchment paper. On a floured surface, roll out a disc of dough to about 1/8-inch thick. Using a 2 1/2-inch biscuit cutter, cut out rounds of dough and place on the baking sheet. Gather scraps of dough and re-roll to cut out additional cookies. Continue with the other disc of dough.

Refrigerate the cookies for 10 minutes before baking, then bake for 12 minutes. Remove from the oven. Leave on baking sheets for a few minutes, then transfer to a cooling rack and allow to cool completely.

For the marshmallow filling: Whisk together the gelatin and 1/2 cup cold water in a small bowl and set aside. Fit a pastry bag with a large, round tip.

Stir together 1/4 cup water, sugar, corn syrup, and salt in a medium saucepan. Bring the sugar mixture to a boil over medium-high heat. As it’s coming to a boil, dip a pastry brush in water and brush down the sides of the pot to remove any sugar stuck to the sides. Once the temperature reaches 225 - 230 degrees, microwave the gelatin on high until melted, about 20 - 30 seconds. Pour it into the bowl of a stand mixer fitted with the whisk attachment and set on low speed.

When the syrup reaches 240 degrees, remove from the heat and slowly pour it into the mixer bowl. Increase the speed to medium and beat for 5 minutes. Increase to medium-high and beat for 5 more minutes. Add the vanilla and beat on highest speed for 1 more minute. Using a silicone spatula or greased spoon, scoop the marshmallow filling into the prepared pastry bag. Working quickly, pipe a generous mound or "kiss" onto the center of a cookie; top with another cookie, pressing firmly to disperse the marshmallow evenly.

For the chocolate coating: Combine the chocolate and cream in a heatproof bowl set over (but not touching) a pot of simmering water, stirring occasionally. Once the chocolate is melted, whisk until the mixture is glossy and completely combined. Reduce the heat to low; you want the chocolate to stay warm and malleable while coating the cookies.

Place a few sheets of parchment paper under a wire cooling rack. Using an offset spatula, drop a marshmallow-filled cookie into the chocolate and flip a few times to coat thoroughly. Tap the spatula against the bowl a couple of times to allow the excess coating to drip off, smoothing the top of the cookie with another spatula if necessary. Place the coated cookie on the wire rack. Continue coating the rest of the cookies, adjusting the temperature of the water as necessary in order to keep the chocolate a "pourable" consistency. (Here's a helpful video about coating the cookies; skip to the 13 minute mark.)

Allow the cookies to sit at room temperature until the coating is set, preferably overnight. You can refrigerate them to speed up the process, although it may alter the texture of the coating/cookie. Store the moonpies in an airtight container in the refrigerator or in a cool place, separated by parchment paper to prevent sticking.

**I created my version of homemade MoonPies after doing considerable research of other online recipes available. The cookie base is loosely adapted from The Pastry Queen Cookbook via Confections of a Foodie Bride, the marshmallow recipe is my own, and the chocolate ganache is adapted from Fine Cooking.
Homemade MoonPies_ed-2
In Recipe Tags chocolate, food, graham cookie, Mardi Gras, marshmallow, MoonPies, RC Cola, Recipe, Southern
5 Comments

Recipe: Beet and Ricotta Gnocchi

February 14, 2012 Nealey Dozier Thompson
Beet and Ricotta Gnocchi-1

Happy Valentine's Day, y'all! I'm not going to lie, though. Unfortunately this day makes me a little bitter. Not because I'm not all about the love, but because I work in the restaurant biz. Of all the dreaded "dining out" holidays (New Year's Eve, Mother's Day), February 14 is the MOST hated. Think about it: a whole evening of uncomfortable guys who would rather be at a sports bar guzzling a beer than a bottle of red (of which they picked the cheapest, mind you), and gussied up girls too worried about fitting in that little red dress to actually eat. Oh, the delight!

But I digress. Despite the dread in my stomach as I gear up for work, it doesn't mean I have to be totally bah humbug. I made this beet and ricotta gnocchi for my *fiancé* today; we enjoyed it as lunch on the couch, followed by an annual appearance of my favorite Kahlua Truffle Triangles. We may have even stolen a kiss, but don't tell my fellow V-Day naysayers.

Whether or not cupid is in the air today, consider making this festive dish for someone you love. Even if that someone is you.

Beet and Ricotta Gnocchi-2
BEET AND RICOTTA GNOCCHI
Source: Evan Kleiman, owner of Angeli Caffe
Serves 2 - 4

This recipe comes from Angeli Caffe, my favorite (now closed) restaurant in Los Angeles. It was just a quick stroll away from my West Hollywood apartment, and my sister and I frequented it often. Although at the time I was a beet hater, this ricotta gnocchi made a believer out of me. It's equally good with spinach, though, if you just can't get past the color. (And please note: this recipe is best started a day in advance, something I didn't realize until it was entirely too late to pull back.)

1 medium or two small red beets, washed
1 pound whole milk ricotta cheese
1 organic or free-range egg
1 cup grated Parmesan cheese, plus more for serving
Kosher salt and freshly ground black pepper
2/3 cups all-purpose flour, plus more for dredging
8 Tablespoons (1 stick) unsalted butter
Fresh sage leaves

Place a cheese cloth-lined colander over a bowl and drain the ricotta overnight, or up to 24 hours.

Preheat oven to 450 degrees. Wrap beets in aluminum foil and place on baking sheet. Bake until tender, approximately 45 minutes. Remove from the oven, open aluminum foil and let beets cool. Slip the skins off with your hands. Grate the beets into a mixing bowl on the large hole of a box grater. Add the ricotta, eggs, Parmesan cheese, and salt and freshly ground black pepper to the beets. Mix well with a whisk or wooden spoon. Add 2/3 cup flour to the ricotta mixture and whisk together to mix. Set the mixture aside for a minimum of 2 hours in the refrigerator. Can be made up to two days ahead.

Use a spring form scoop to measure out the dough. Use your palms to form dough balls about the size of a ping pong ball. Roll the ball into a bowl of flour, carefully turning to lightly coat all sides, tapping off any excess. Lay each dumpling on a parchment-lined baking sheet. Continue forming the gnocchi until all the mixture is gone.

Add the dough balls into a pot of gently simmering salted water and cook for about 4-5 minutes. Using a slotted spoon, remove them from the water as they are done and place them on a platter. Use a paper towel to soak up any excess water.

Meanwhile, melt the butter together with the sage leaves in a skillet over medium heat. Let the butter lightly brown and the sage leaves become nice and crispy, about 10 minutes. Add the cooked gnocchi to the skillet and toss with the butter to warm them up a bit. Season with salt and pepper, if desired. Serve immediately with fresh Parmesan for grating.

Beet and Ricotta Gnocchi-3
In Recipe Tags Angeli Cafe, beets, gnocchi, Recipe, ricotta, Valentine's Day
3 Comments
← Newer Posts Older Posts →

Powered by Squarespace